Designing the curriculum
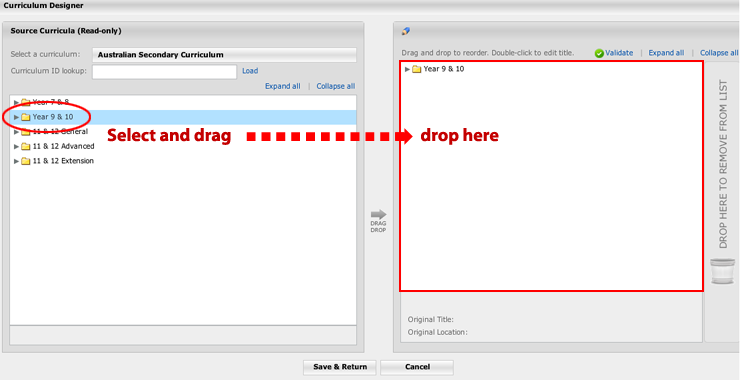
From the main Curriculum Designer screen, select + Design curriculum. A new page opens. On the left-hand side is the national curriculum, which contains the full suite of lessons you can use in the construction of a new curriculum. On the right-hand side is a blank canvas upon which to construct your curriculum.
To create a new curriculum, start by identifying the course which contains most of the lessons for the new curriculum. Continuing the example of constructing a ‘Year 9 Custom Curriculum’ for a particular Year 9 class, we identify the Year 9 & 10 course as containing most of the lessons required for this class. Accordingly, we drag and drop the ‘Year 9 & 10’ folder onto the RHS box.
The curriculum can be renamed by double clicking on the title. Then expand the folder and make the required changes to the course. You can change the title of any folder or lesson, reorder the lessons by dragging and dropping into new positions, or remove unwanted lessons by selecting them and dragging them to the bin.

Lessons from other courses, such as Year 7 & 8, can be added to the new curriculum by expanding the folders in the left-hand box and dragging the lessons into the new curriculum.
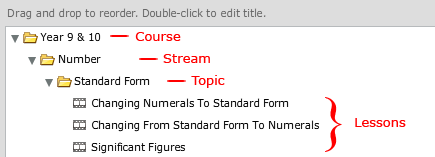
Note: All courses follow the hierarchy Course > Stream > Topic > Lesson. Accordingly, new curricula must also adhere to this structure.
When dragging and dropping folders or lessons from the LHS box to the RHS box, or reordering folders or lessons within the RHS box, ensure you drop at the correct level. For example, drop a lesson directly above or below other lessons, or directly under a topic folder (in which case it will go within that topic). Do not drop a lesson at the Course level, or within a Stream. The Curriculum Designer will prevent dropping at the wrong place.
At times it may be useful to preview the contents of a lesson before deciding whether to include it in the curriculum. To do this, first select the lesson, then select any of the options on the status bar at the bottom of the screen.
Before saving a curriculum, select Validate from the upper right hand corner, to ensure there are no errors such as multiple copies of the same lesson.

Once the curriculum has been validated, select Save & Return at the bottom of the page.
Designing the curriculum
From the main Curriculum Designer screen, select + Design curriculum. A new page opens. On the left-hand side is the national curriculum, which contains the full suite of lessons you can use in the construction of a new curriculum. On the right-hand side is a blank canvas upon which to construct your curriculum.
To create a new curriculum, start by identifying the course which contains most of the lessons for the new curriculum. Continuing the example of constructing a ‘Year 9 Custom Curriculum’ for a particular Year 9 class, we identify the Year 9 & 10 course as containing most of the lessons required for this class. Accordingly, we drag and drop the ‘Year 9 & 10’ folder onto the RHS box.
The curriculum can be renamed by double clicking on the title. Then expand the folder and make the required changes to the course. You can change the title of any folder or lesson, reorder the lessons by dragging and dropping into new positions, or remove unwanted lessons by selecting them and dragging them to the bin.
Lessons from other courses, such as Year 7 & 8, can be added to the new curriculum by expanding the folders in the left-hand box and dragging the lessons into the new curriculum.
Note: All courses follow the hierarchy Course > Stream > Topic > Lesson. Accordingly, new curricula must also adhere to this structure.
When dragging and dropping folders or lessons from the LHS box to the RHS box, or reordering folders or lessons within the RHS box, ensure you drop at the correct level. For example, drop a lesson directly above or below other lessons, or directly under a topic folder (in which case it will go within that topic). Do not drop a lesson at the Course level, or within a Stream. The Curriculum Designer will prevent dropping at the wrong place.
At times it may be useful to preview the contents of a lesson before deciding whether to include it in the curriculum. To do this, first select the lesson, then select any of the options on the status bar at the bottom of the screen.
Before saving a curriculum, select Validate from the upper right hand corner, to ensure there are no errors such as multiple copies of the same lesson.
Once the curriculum has been validated, select Save & Return at the bottom of the page.